How to Use QuickBuild (Guide for Beginners)
Posted on 2023-06-20 · 10 min read

The world of Web3 is fascinating, with builders and users pushing the boundaries of this cutting-edge technology. Eternal Digital Assets developed QuickBuild in partnership with Freename to drive the Web3 mission by encouraging users to build websites on their domain names.
As Web3 pioneers, we believe that websites make domain names more valuable, and one of the best ways to incentivize adoption is to provide a plug-and-play Web3 site builder. In this guide, we take you by the hand and show you how to build your first Web3 website using QuickBuild.
Ready? Let’s go.
How to Use QuickBuild
We designed QuickBuild to be extremely easy to use for even those with little to no Web3 experience. Once you have a Web3 domain name, everything else becomes a plug-and-play affair.
Step 1
Buy a Web3 domain name. (You can skip this step if you already have one). If you do not have one, you can buy Web3 domains from the EDA marketplace. Alternatively, you can go to our partners at Freename.io.
Step 2
Connect your Web3 wallet (which holds the Web3 domain name) to the EDA QuickBuild platform
Step 3
Complete Website Settings
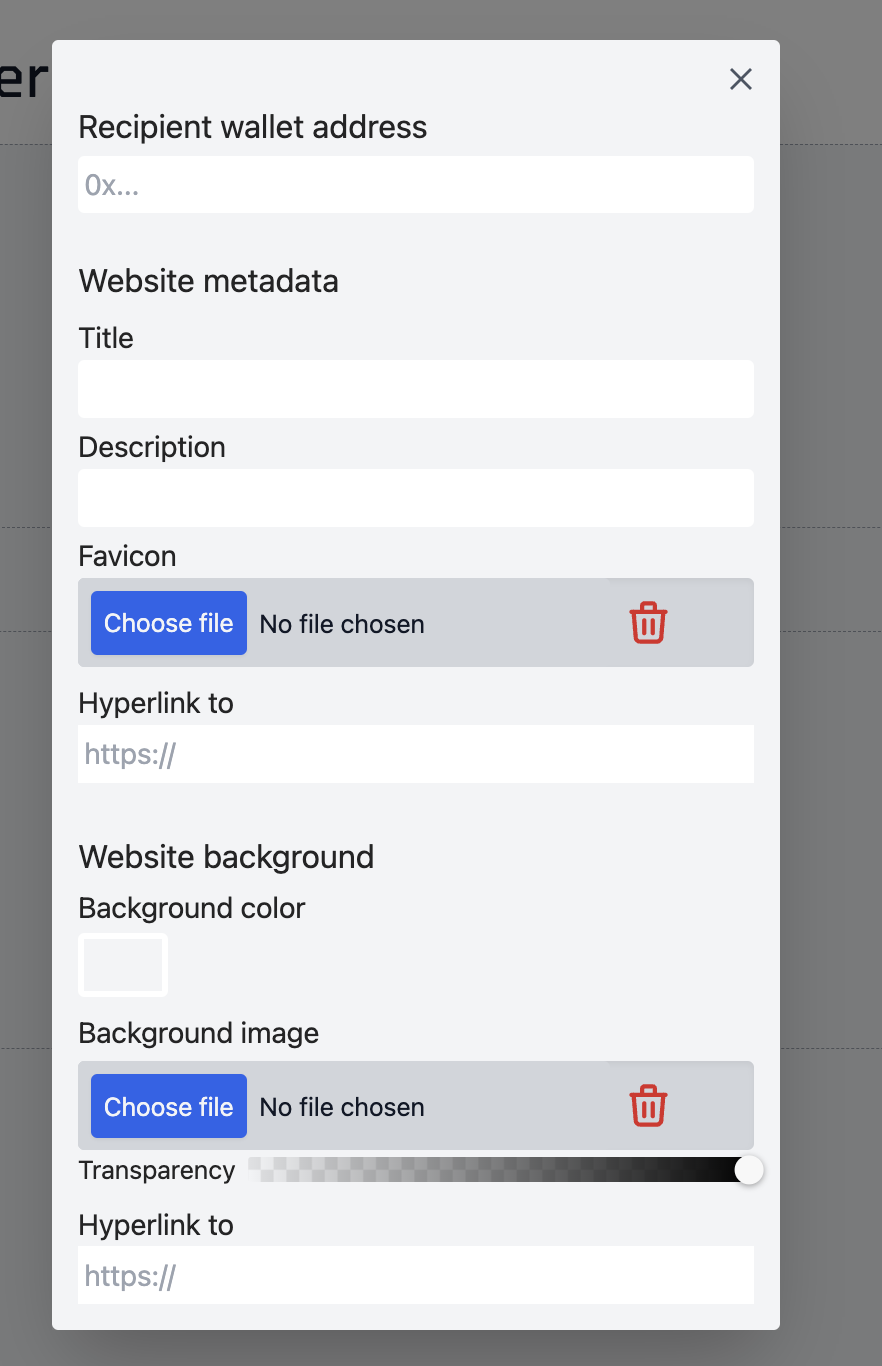
- Recipient wallet address: Add your crypto wallet address
- Website metadata: This includes basic information about your website.
- Title: Your website title, e.g., Eternal Digital Assets
- Description: Use some text to describe what your website is about, e.g., Your number one Web3 domain platform
- Favicon: This is an image that shows on the browser when a visitor accesses your website. Recommended image size is 512*512 pixels.
- Hyperlink to: Add a website address (optional)
- Website background: Choose a background for your website, either a color or an image.
- Background color: Set your chosen color as your website background
- Background image: Set an image as your website background.
- Transparency: Modify transparency for chosen image or color background.
- Hyperlink to: Add a link that is clickable from anywhere on the background image.
Step 4
Build your website! This is the simplest part of it, and there’s a lot to play around with. Let’s break it all down.
The website builder is divided into three sections.

- Header
- Body
- Footer
Header
The header has three sections -> Left, Center, and Right.
Center: Add a Website Title as Text or Image. Use text formatting to customize text display.

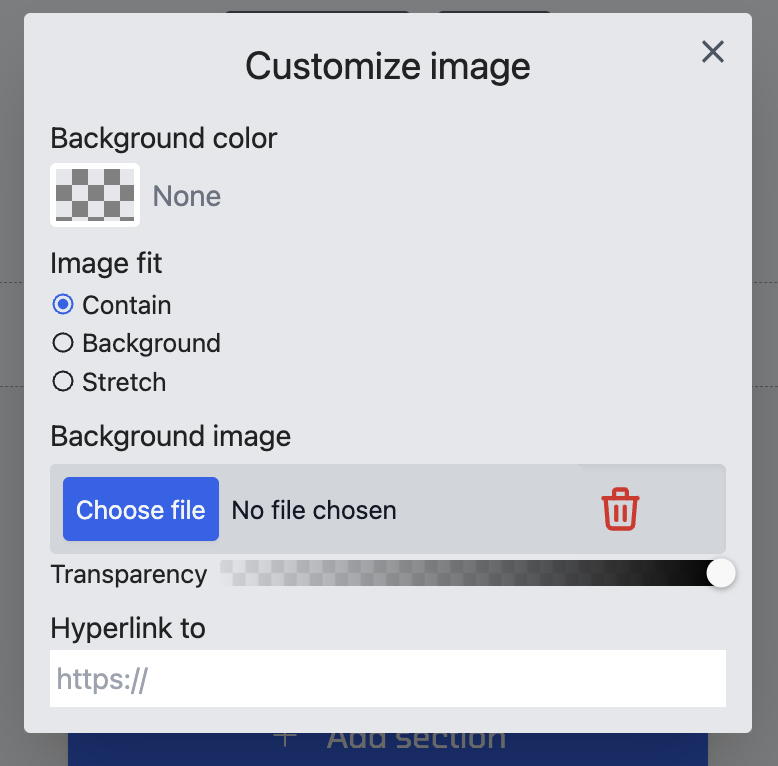
Left/Right: Add an image to either section. You can also use Background Color, Image Fit, Transparency, Hyperlinks to customize image display)
Body
As the name implies, this is the main body of the website. The opportunities for what you can add to this section are limitless. Simply begin by selecting the first Column layout and Column Height and clicking Add Section.

For each newly added section, you can either use text or image, or a combination of both to customize your website. The recommended image size is also provided for each section, e.g. 450*250 pixels, etc.

You can many layouts and experiment with different features.
Here are some really cool sites we’ve built with QuickBuild → Browse with Freename Extension or enter the IPFS hash in your URL bar (Brave Browser)
DGIL.NFTunes → ipfs://bafybeid6gatp34tudzlp5vm4fiio5dbairn6pvksd3f5vqdamuufj22lqu/
NewAndUsed.CarPrices → ipfs://QmXknE6yny13whNYF65kTHx8J19K5sJQQtUyy5ragcNkFn
Affordable.HouseForRent → ipfs://QmaU6m46oPgcjJwt91TWPeNtti6P7Whjdsk32yaPTXhiEx
MostFollowed.Tiktoker → ipfs://QmQfxdRd52GayUZCtTGNu3hfMfdXjQvh3n39kDvnEbxqdX
CollegeDiplomas.Web3Academy → ipfs://QmXbUDq3qCJ8iBdcYDMxjdv63LvYDdKYAMaU22B2id9Uu5
Footer
In this final section of your website, you can add your name, and social media links, by clicking Edit Footer Information.

Extra Features
- Delete: There is a delete button to add or remove columns while building your site.
- Preview: At any stage of building your website, you can use the Preview button to see what the finished website would look like.
- Connect Wallet: The Connect Wallet button is automatically added to your website when you finish building. This integration allows website visitors to make purchases on your website. The funds are automatically sent to the address provided under Website Settings → Recipient Address
Once you’re done with building the website, click Complete on the QuickBuild page.
Step 5 (Checkout)

At this stage, you can simply choose to download your website if want to host it through another IPFS Hosting Provider.
However, we offer the cheapest hosting packages, you can simply choose your preferred hosting plan after building your site. A Basic Plan ($1/mo) is usually best for most Web3 sites. The hosting period is also set to 12 months by default. However, you can extend the package for as long as you desire.
The fixed pricing for QuickBuild is $49 USDC and this is included in the Total Price displayed at Checkout.
Note: For a limited time, you can use QuickBuild for free by using the coupon code BUILDFREE upon checkout (Valid until June 30)
- Select the option to Pay With Wallet (Ensure you have the amount in USDC in your wallet) before selecting the option. The amount would be automatically deducted from your wallet.
- If you chose to Pay with a Card, provide your card details on the next page.
Step 6
Now, we’re all done! Input the Web3 domain address where you want to host the website. Then click Complete.
Step 7
Access your website, using any of the following options:
- Freename Extension: For Freename-hosted Web3 domains, Install the Freename Web3 extension. Click Browse
Input the Web3 domain address and open your newly built website.
- Brave Browser: Input your Web3 domain address on your address bar to access your website.
- Opera Web3 Browser: Install the Opera Web3 browser and input your Web3 domain name in the address bar. Choose the domain provide (Unstoppable Domains) to view your website.
There you go! That’s how to go from nothing to having your first Web3 website. Got questions? Join our Telegram Community